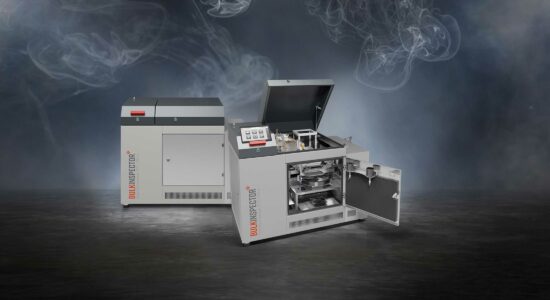
The fully automatic SIEBTECHNIK TEMA gas pycnometer is a high-precision device for determining the density (skeletal density, also known as pure density or true density) of solids and bulk materials.
A WORLD PREMIERE
Why is it the next generation?
The sample to be analyzed is normally placed manually in the measuring chamber of the gas pycnometer. With our device, the sample is placed in the measuring cell (sample chamber) using a sample handling device. The previously completely manual process is thus automated and the volume and mass of the solid are now determined in a single device.
The sample material is supplied to the device from outside, ideally via a sample magazine in which the samples to be analyzed are buffered for the desired time.
MOST IMPORTANT FEATURES
What are the advantages of the BULKINSPECTOR over conventional gas pycnometers?
- No manual intervention required during measurement, weighing and volume determination take place automatically in the device
- Highly accurate, fast and reproducible measurement of sample density
- Use of different sample gases
- Non-destructive testing
- Various measuring cup volumes
- Temperature control of the appliance via Peltier elements
- User-friendly interface & mobile control element
- Data transfer to external systems
- Online analysis with automatic sampling from the process
Suitable for use in automated production processes
Precise and indestructible
The BULKINSPECTOR gas pycnometer is a closed system that is unaffected by the harsh environment of an industrial plant, i.e. noise, dust, heat, cold, dirt or moisture. The insulated steel housing is largely insensitive to external influences. The samples can be fed in through conveyor systems, such as a closed vibrating conveyor trough. This prevents contamination of the sample. As weighing takes place inside the BULKINSPECTOR, external influences can also be virtually ruled out here. In addition, the high-precision load cell is less sensitive to vibrations than conventional standard scales. The temperature inside the device is kept constant by a Peltier element, so heat or cold have no influence on the measurement result, even values such as the constantly changing air pressure do not distort the measurement result.
This makes the BULKINSPECTOR gas pycnometer equally suitable for laboratory and harsh process conditions.
What problems do standard pycnometers have in industrial plants?
USER FRIENDLINESS
and extended functionality
The pycnometer is controlled via a mobile control unit (tablet), which is included in the scope of delivery.
After opening the app, you are presented with a user-friendly, modern interface for operating the device. You can use this interface to set and manage formulas for various samples. You also have the option of managing and exporting measurement protocols and adjusting the basic settings of the device. Depending on the user level, some of these functions are password-protected.
You can also access the operating instructions via the tablet. If necessary, you can order the required spare and wear parts directly from us online via the app.
FUNCTIONAL PRINCIPLE
and technical details
After the material sample has been placed in a measuring cup, it is inserted into the measuring cell (sample chamber) via a handling device, where the volume of the sample is determined according to the selected presetting.
After the multiple determination of the volume, the handling device transports the material to the scale to determine the sample mass.
The two parameters volume and mass are now known and the density of the sample is automatically calculated from this.
Finally, the handling device removes the measuring cup and empties the material sample into the emptying device. There, the measuring cup is additionally cleaned with compressed air and is then ready for the next sample.
As the sample volume must be matched to the volume of the measuring beaker for precise measurements, the fully automatic gas pycnometer offers the option of holding various measuring beakers in parking positions in the device.
For automatic calibration, one of the measuring cup positions can be provided with a calibration volume so that recurring measurements for recalibration can be carried out during operation.
When selecting the components, particular attention was paid to ensuring that both the mechanical measurement setup and the selection of sensors, as well as the evaluation electronics, lead to reproducible measured values with a low standard deviation.
In addition, the inside of the insulated housing is heated or cooled via Peltier elements as required in order to maintain a constant temperature for the measurement.
Find out how our pycnometer works
Watch these videos
Technical data
Important figures
| Model | PYC 130-A |
| Measuring cup volumes | 130 / 65 / 10 cm³ |
| Number of spaces for measuring beakers | 4 |
| Sample Gas | Helium |
| Measuring pressure | 0 ... 140 kPa |
| Scales | 0 ... 510 g +/- 0.0001g |
| Measuring temparature | 15 ... 35°C |
| Calibration method | Automatic calibration with calibration sphere |
| Measurement uncertainty | +/- 0.02% |
| Data interface | WLAN |
| Dimensions (W/D/H) | 1100 x 675 x 855 mm |
| Weight | 190 kg |
| Power supply | AC 110 V/16 A/60 Hz, AC 230 V/10 A/50 Hz |

SIEBTECHNIK TEMA on site
Find the right contact for your region.
How can we help you?
We have the right solution for every task. And if not, we’ll work with you to find one. Get in touch with us!
Our specialists will be happy to advise you individually on site or remotely, and are available to answer any questions you may have. Send us a message using our


